24
May
17

The Filter Final

Image 13

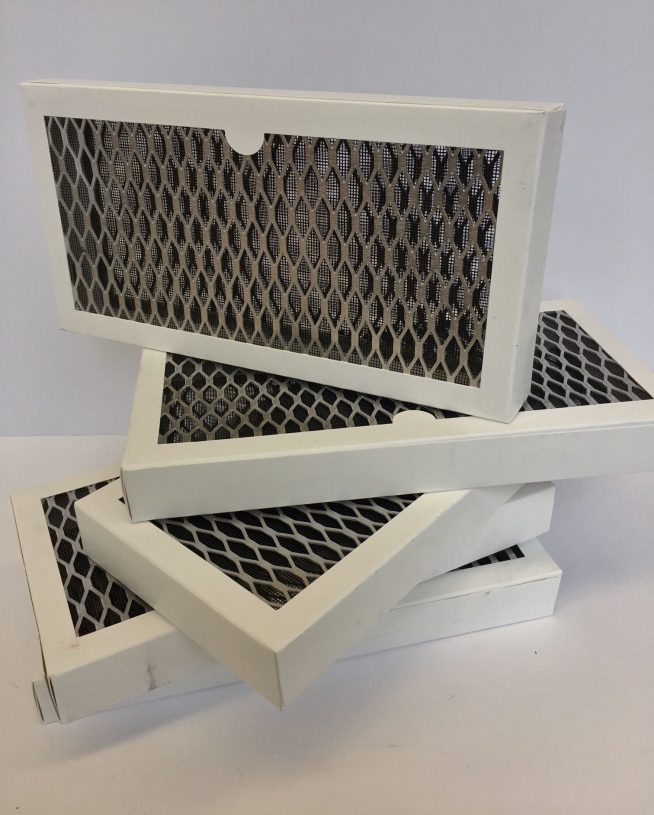
It all started with Phil and Tammy, who build devices used in the cleaning of medical equipment. They had ordered a large number of filters, the construction of which was based on information provided by a hospital. It turns out that this information was incorrect, resulting in the manufacture of filters that could not be used. Rather than send the unusable filters to the landfill, and knowing that I use a lot of repurposed materials in my artwork, Tammy contacted me and asked if I could use them. Upon seeing the filters, I didn’t feel I could use them all myself, but the sheer number of these box-like structures made me think they might be a good design project for my 3D students. It turns out I was correct!

Each filter is approximately 5″x11″x1″. They are made up of three components: an inner soft screen or mesh material, black in color; an outer wall of expanded metal sheet (Expanded metal sheet is made by first creating multiple slits in the sheet, and then stretching the sheet. The stretching creates a unique diamond pattern opening with one of the strands protruding at a slight angle.); and an outside white paper frame.

I decided I would use the filters as the basis of the last project of the semester for my ART 160 class at West Liberty University. (ART 160 is an entry-level 3D design course for freshmen entering any one of the University’s visual arts programs.) Each student was permitted to have up to three filters. Filters could be manipulated in any way the student desired. Students were only permitted to use or add wire, glue, or paint to their filter works. They were not permitted to add objects or other foreign materials to the filters. Students were not required to use the entire contents of each filter.

Students had nine days in which to complete the project, which included two in-class studio days. Each student presented their completed project at our final semester critique. The filter “sculptures” were graded using the following criteria: (1) Objectives met/student followed project guidelines; (2) Composition; (3)Creativity; and (4)Craftsmanship/construction.

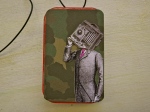
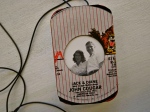
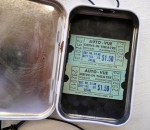
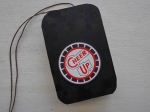
Overall, I feel the students did an excellent job of problem solving and repurposing the filters. I believe the students really pushed themselves on this project, resulting in a wide range of original, creative 3D forms. Check out the student work and let me know what you think.

This slideshow requires JavaScript.


15
Mar
16

Making Moondog

IMG_4639

Robert Villamagna and “Moondog” at thr Crosscurrents Exhibition, Stifel Fine Arts Center, Wheeling, WV.

My newest work is a portrait of “Moondog”, described by the residents of Wheeling, WV as an icon, a mascot, a protector, a cyclist extraordinaire, a legend, and keeper of all flags waving. The portrait is 36″x36″ and made of repurposed lithographed metal, highway signs, license plates, nails and screws on wood panel. Here are a few images to show how my portrait of Moondog came together.

This slideshow requires JavaScript.

To view more of my work, please visit my website!

13
Jul
15

Jurying the 2015 Central PA Festival of the Arts

Best of Show recipient, photographer Patricia Wilder, and myself.

Best of Show recipient, photographer Patricia Wilder, and myself.

The Sidewalk Sale and Exhibition at the annual Central PA Festival of the Arts is consistently ranked as one of the top outdoor fine art and fine craft shows in the country. This event brings artists and craftspeople from across the nation to State College, PA. More than three hundred exhibitors offer a wide variety of objects for sale including baskets, ceramics, jewelry, fiber, painting, mixed media, photography, sculpture and wearable art.

As part of the Sidewalk Sale and Exhibition’s jury process, almost 1,000 artists from the United States and several foreign countries submitted digital images of their work to be juried. Last February, Four other jurors and myself reviewed the images, with the artists receiving the highest scores were accepted into the Sidewalk Sale and Exhibition. While I have exhibited at the CPFA nearly every year since 1996, this year it was my honor to serve as a juror. My fellow jurors were:

Nancy Burch Brassington grew up in a farming community in northern Virginia where life centered around work on the farm, 4-H Club, and the rural Methodist church. She left the farm for the bright lights of Fredericksburg, earning an undergraduate degree in philosophy from Mary Washington University. After earning two degrees in painting and drawing from Penn State, she found her voice as a painter whose work reflects her rural roots. Today she has a twenty-five year exhibition record and is currently is represented by the Agora Gallery in New York City.

Cappy Counard makes jewelry and small containers that draw from her interest in architecture, the structural geometry found in nature, and those unexpected moments of beauty that make us stop and pay attention. In addition to her studio work, she is a professor in the Metals/Jewelry program at Edinboro University of Pennsylvania where she has been a professor since 1999. She has exhibited, lectured and demonstrated extensively throughout the United States

An assistant professor of art at Juniata College in Huntingdon, Pennsylvania, Pat Howard teaches photography and digital art. Prior to her engagement at Juniata, she taught drawing and photography for the School of Visual Arts at Penn State, including study abroad programs in Mexico and Ireland. For many years she was a rostered artist with the Arts in Education residency program of the Pennsylvania Council on the Arts, teaching photography workshops in K-12 schools throughout central Pennsylvania.

Jordan McDonald is currently a resident artist at The Clay Studio in Philadelphia and is teaches ceramics at Temple University’s Tyler School of Art and at the Maryland Institute College of Art in Baltimore. He received his BFA from the Nova Scotia College of Art and Design in Halifax, Nova Scotia and his MFA from the New York State College of Ceramics at Alfred University in New York. McDonald utilizes a wide array of techniques and materials in his work – primarily pots that are rooted in the history of ceramics.

For me, jurying the Central Pennsylvania Festival of the Arts was a true privilege. Shaking hands and talking with over 300 artists, seeing their work up close, and learning about their process was an amazing experience that was both gratifying and inspirational. I cannot put into words how moved I was by many of these artists and craftsmen upon hearing how passionate they were about the work they create. I walked away from this experience a more invigorated artist, and a bit more appreciative of the work and creative energy put fourth by my fellow artists. My deepest thanks to Rick Bryant, Carol Baney, Pam Lausch, and the entire CPFA staff. It was a wonderful experience! And a special thanks to my wonderful wife and partner, Chris, who supports me when I say “I agreed to be a juror!”

Here is a just a taste of the art and artists at the CPFA, via my iPhone:

This slideshow requires JavaScript.

13
Apr
15

The Altoids Project: MADFEST 2015

IMG_5981

The 2015 West Virginia MAD (Media Arts and Design) Festival took place on the Campus of West Liberty University on Friday, April 10. MADFEST 2015 was a day filled with 28 workshop sessions, professional presentations, and a student media arts awards competition and ceremony. Each year, Prof. James Haizlett asks art faculty members to present a 50 minute workshop (or two) for the visiting high school students.

I change my workshop presentation each year just in case a student might be attending for a second year. I was having difficulty coming up with a new workshop idea when I remembered I had several boxes of Altoids containers stored away. About fifty of the tins came from an employee where my wife works, and several hundred more were sent to me by gentleman in Maryland after he had visited my studio. I felt these containers could prove to be perfect supports upon which the visiting students could create collage or small assemblage works.

I began preparing the cans a few days before my two workshops. Using mat board samples that were headed to the dumpster (Thanks Amanda!), I cut pieces to fit the inside and outside each Altoids can. Other cans I primed and painted flat white. Since we only had 50 minutes for each workshop, I wanted the cans ready to accept most of the materials that we had available. I also punched two 1/8″ holes in the top of each tin in order to insert a cord for wearing the finished work.

This slideshow requires JavaScript.

In addition to the Altoids tins, each table had craft knives, glue, assorted Sharpies, and scissors. On a nearby counter was colored papers, wallpaper books, color mat board samples, wood shapes, glass beads, etc. Another table served as a hot glue station with several hot glue guns at the ready.

The night before the workshops, I created seven examples to show the students. My hope that these might jump start their creative juices. I photographed each example and presented a brief Keynote presentation at the beginning of the workshop. Here are my examples, front and inside:

I feel that the workshop was successful for the most part. Should I try something similar in the future, I will plan to have more small found objects on the materials table (most of our materials were 2D). Here is a slide show of the students working and some of them showing their work:

This slideshow requires JavaScript.

25
Mar
15

Spring Break Road Trip/part 1.

IMG_5244

WLU’s spring break was in mid-March. Chris took a few days off work and we headed north for a few days. (Yes, I know most people, especially students, use spring break as opportunity to go somewhere warm! ) We spent a fun three days pursuing some of our favorite things: art, antique hunting, food, beer, and funky tourist attractions.

Our first stop was Akron, Ohio to visit the Akron Art Museum. It is just a little over two hours from home, and yet Chris and I had never been there. The museum combines a late nineteenth-century brick and limestone building (originally the city’s main post office)with the twenty-first century glass and steel structure by the celebrated Viennese architectural firm Coop Himmelb(l)au. This impressive addition was added in 2007 and is spectacular both inside and out.

IMG_5240

We saw several exhibitions in the museum, but I will focus on our two favorite:

Beauty Reigns, which closes May 3, 2015, features the work of 13 emerging and mid-career abstract painters, working in studios across the United States. The exhibition is chock-full of big works that blast you with intense color, multi-layered surfaces, and high-energy patterns. We loved this show!

IMG_5212

Christopher Pekoc: Hand Made made my day. I told Chris that seeing Pekoc’s work made our whole trip worthwhile. Christopher Pekoc’s mixed media assemblages are beautiful, intense, and gutsy all at the same time. Among the media used by this Cleveland artist: gelatin silver photography, Xerox prints, shellac, sandpaper and punches—in novel ways to create evocative images. He employs machine stitching in his work as well, which not only adds additional surface texture, but seems to strengthen his compositions. The image of the human hand shows up in many of his works, which mirrors the artist’s hand in the creation of these works. Pekoc’s work can be seen through April 26, 2015.

P1030333

Before we left the museum, Chris and I visited the museum store where did some damage to our wallets, including a catalog and video of Pekoc’s works. (As of this writing, I have not watched the video yet!) Double thumbs up to the Akron Art Museum!

IMG_5266

Before leaving the “rubber city”, we visited the tasting room of the Hoppn’ Frog Brewing Company. Good beer and good grub to go with it. I especially recommend the Hop Damn IPA!

08
Feb
15

The Kid Who Wanted X-ray Vision

As a kid growing up in Ohio, I spent a lot of time reading comic books. When I was not playing outside with my friends, I could usually be found on the living room rug, or the floor of my pup tent, lost in a comic book. It did not matter the theme. I enjoyed a variety of topics. Superman, Batman, Donald Duck, Lone Ranger, Richie Rich, Casper, anything but the romance stuff! The inside cover usually had ads for a variety of products, every thing from miniature cameras to a book on how to “throw your voice”. The item I most coveted was the X-ray Specs! Imagine, for the price of just one American dollar a kid could actually obtain X-ray vision!

xRay-Glasses-Comic-Book-Ad


Sadly, I never had a whole dollar that I could send away for this wonderful item. Back then, I was lucky to have the dime to purchase the comic book itself. Yes, ten cents was a huge deal then. Had I dared ask my mother for a dollar to spend on such a superfluous piece of plastic, she would have thought I had totally lost my young mind. Reflecting back on those much-wanted Xray glasses was the inspiration for my latest artwork: Xray Vision!

IMG_4674

IMG_4675


I started out with a 24″x36″primed wood panel and began a loose sketch using a black Sharpie. When working with “tin”, I tend to keep my foundation sketch very loose. I want the sketch to give me a sense of how I am going to use the space, yet loose enough that my composition is open to serendipity. I really wanted this piece to be about the glasses, so I was building my sketch around those glasses. Since the wearer’s face would play a supporting role, I filled my space by cropping the head and chin of the person.

IMG_4678


Using some black sheet metal, I cut the shape of the frames of the eye glasses. From there I began working on the lens. I remember the image of the Xray specs in the ad having a circle within a circle, as when one drops a stone into a pool of water. When I actually Googled the old advertisement, I saw it was not quite as I remembered. However, the specs did show energy and that is what I wanted.


IMG_4682

I began with a series of circles in white metal, but noticing a very colorful popcorn can in the studio I decided to change course. I cut two spirals from the flattened can and attached them to the eye glasses. Cutting the spirals was bit more challenging than I had predicted, but I felt good about the result.

IMG_4685


IMG_4687


The most difficult part of the piece was now behind me, while the most time consuming work was about to begin. I began building the face and head using tin in a range of earth tones. I worked at giving the face some depth through subtle changes in color and value, while at the same time trying to keep the overall look a bit loose. It is also important to me to keep in the piece some of the typography and branding that is on the metal itself, but without it becoming too distracting. I struggle with that issue!

IMG_4696

IMG_4702


Once the face and head were nearly complete, I began filling in the negative space, aka “the background”.  I needed the negative space to be dark enough to contrast with the face and head, and not so strong that it would take away from the eye glasses. This took a trial and error approach as I built the background using a variety of darker values and kept my tin palette primarily cool. As you will see in the finished piece, the background is built using a combination of retro branding and pop culture images from repurposed product containers.

P1020622

The finished piece ready to attach the hanging hardware! As a last minute addition, I added two small white metal elements to give the eye glasses some extra punch. Thanks for your interest in my work. Whatever YOUR media, go make some art!


25
Jan
15

6 X 6 X 6

P1020487 - Version 2    Last week was the opening of the Art Faculty Exhibition at West Liberty University’s Nutting Gallery. This annual event, which  takes place every January, has a different theme each year. For example, last year was The Dog Show, and in 2013 it was The Meat Show. This year the exhibition was titled “6 X 6 X 6”. Work entered in the show could be any subject or media, but each piece could be no larger than six inches in any direction.

Members of the art faculty vote on the next exhibition theme about eight months in advance, so we have plenty of time to consider the theme and build a new body of work. Last September I began thinking about how I might address the theme, but I did not actually begin work until our winter break in mid-December. Since size (limit of six inches in any direction) was our only controlling factor, I felt this was a time I could playful and and just have fun with it.

I purchased a sheet of 4’x8′ finished 3/4″ plywood that was primed on one side. From this sheet I cut forty 6″x6’squares. A few days into this project I increased the number of wood squares to sixty. As I began covering the wood squares with metal, paper, paint, and other media, the process reminded me of the pages of a sketchbook

A sketchbook is a book or pad with blank pages for sketching, and is frequently used by artists for drawing or painting as a part of their creative process. The content of sketchbooks usually falls within two broad categories: Observation and Invention. Observation focuses on documentation of the external world of the artist, while invention follows the artists’ internal journeys as they develop compositional ideas.

The sketchbook I created is made up of sixty wood “pages”. Each 6”x 6” page contains images in a variety of media. Like a traditional sketchbook, many of these pages are a documentation of the world as I see it or have lived it. These pages include such things as my childhood heroes, or various stories from my life. Other pages explore the creative process, and are nothing more than rough sketches of an idea that may be developed into a larger, more refined work down the road. Here, as in any sketchbook, they all mingle into one big visual salad.


This slideshow requires JavaScript.


17
Oct
14

Devil Jug

042813-artsbriefs_2

Last February I was commissioned by a Pennsylvania woman to create a metal collage piece, and I finally got on it last month. The woman was totally open to the direction of the piece, and I was pretty much free to do what I wanted. While I did not feel I needed to create something that would match her couch, I did feel that knowing her collecting interests and what was in her home would help me decide where I might go with this work. In addition to walls filled with paintings and photographs, she had a collection of ceramic face jugs. In case you are not familiar with this art form, the following is a brief history of the face jug by potter Karl Kuhen:

Face jug history is surrounded in mystery. Stories vary about who created face jugs and the reasons for their creation range from the 1700s to the present.

One version is that an unknown potter in Massachusetts created the first face jug in or around 1810. This is inconsistent with the theory that face jugs originated with African slaves who worked on American plantations. A great many slaves brought to the United States were processed in the Caribbean where they acquired a belief in Voodoo. The exposure to Voodoo, along with their own beliefs brought with them from Africa and the introduction to Christianity must have created extraordinary confusion to people from an entirely different culture.

Jug shards have been found on grave sites and along underground railroads. This might imply that the face jugs were very important to the escaping slaves. Speculation is that slaves who were not allowed to have tomb stones. So they developed face jugs as grave markers designed to scare and keep the devil away.

In the 1800’s, many people were becoming ill and dying from the lead glazes used to seal the low-fire pottery that was being used by the settlers of the southern USA. In response, Dr. Abner Landrum founded Pottersville, a group of about 16 or 17 houses with families in the area within 1.5 miles from the Edgefield court house in South Carolina (now Aiken County). It grew into a village of about 150 people, mostly slaves. David Drake is the most notable. They produced lead-free pottery and face jugs until the beginning of civil war. This pottery is now known as Edgefield Pottery. It is the only form of pottery that was made entirely by American tradition. Alkaline glazed stoneware was a re-discovery by Dr.Landrum and his two brothers. (It originated from the Han Dynasty in China over 2000 years ago.) When the civil war started in 1861 Pottersville was abandoned but alkaline glazed pottery continued to be produced in the south. The picture above is from an Edgefield excavation. (Courtesy of Gary Dexter)

In the 1820’s the practice of making face jugs spread throughout South Carolina and into Georgia, North Carolina and other states. In the 1830s about seventy folk potters operated pottery shops within a four mile area of Mossy Creek in White County, Georgia. This became one of the largest pottery communities in the South. Names like Dorsey, Meaders, Craven, Davidson, Pitchford, Brownlow, Warwick, Chandler and Anderson became known, at that time, for their pottery.

 The purpose of the jug evolved. The face jug also became known as the ugly jug in the 1920’s and was used to store alcohol. The jugs became uglier in an attempt to identify the contents and frighten children. Parents warned the youngsters to stay away from them.

Lanier Meaders (1917-1998) is the most famous Georgia folk potter who made face jugs. The Meaders family was famous in Georgia for their stoneware pottery. Lanier was the face jug maker who kept folk art pottery alive in the south   almost on his own!

Today, a few family-operated potteries are still making face jugs in the traditional way. They start with the local clay and fire their work in a wood-burning kiln. The traditional way of making a face jug would often incorporate the use of porcelain teeth and eyes. At the end of a long the day of production, scrap clay is frequently used to make face jugs just for fun.

Recently, quite a few independent potters living throughout the world have taken up the art of making face jugs, Some of these face jugs are crafted in a traditional fashion while other potters are creating far out, highly complex and unique face jugs using a variety of firing techniques.

That collection of face jugs, especially her group of red glazed devil jugs, gave me the inspiration I needed. Here is my version, in repurposed metal, of a red devil face jug and how it was constructed:

This slideshow requires JavaScript.

19
Aug
14

Creating Bat Kid

Working out the mask.

Working out the mask.

I recently received a prospectus in the mail from a local art center. This prospectus is for an all-Halloween exhibit that sounded like too much fun for me to pass up. The deadline for submissions is the end of August, so if I was going to participate I needed to get moving.

When I was kid growing up in Toronto, Ohio, Halloween was a really big deal to me and my buddies. Over the years, I went trick or treating in a variety of costumes, some homemade and some store bought. One of my favorite comic book heroes was Batman, and while I never spent a single Halloween as the “caped crusader”, I knew right off that I wanted to create an image of a kid wearing a Batman mask.

A couple of weeks back I purchased a 46″x40″ oak framed blackboard at Rogers Flea Market in Ohio. The blackboard itself was not slate, but rather plywood painted flat black. This rascal is heavy, but I knew it was just right for building a tin piece on, and it was priced at only ten bucks! (A little added note: the back of the blackboard is stamped “Property of US Post Office 1966”.) I decided this would be the support I would use to create my “Bat Kid”.

I have included a slide show of how Bat Kid evolved. What you are looking at is about 24 hours work over a three day period. The weather cooperated and I was able to work on the entire piece on the brick patio outside of my studio. He is repurposed metal and nails, with the frame painted in blue enamel. And although we are not done with summer quite yet, let me be the first to wish you a Happy Halloween!

This slideshow requires JavaScript.


06
Jul
14

Rogers is Bonkers on July 4th!

Selfie in the middle of the Rogers madness!

Selfie in the middle of the Rogers madness!

I had not planned to go back to Rogers only one week after my previous trip, but my son and a friend were interested in going. As sometimes happens, I ended up making the drive myself, all the time thinking I should be in the studio. However, Rogers was going gang busters and I did find tin and other materials.

Just a portion of the huge Rogers crowd.

Just a portion of the huge Rogers crowd.

I had never been to Rogers on July 4th, and what an experience! It seemed every dealer space was filled, and there were even dealers set up in grassy areas where I had never seen set-ups before. The people were shoulder to shoulder, and just walking at any more than a crawl was difficult. When you did see something you wanted to look at closer, you had to push your way in and push your way back out. Craziness!

A half dozen table into the flea market and this caught my eye.

A half dozen table into the flea market and this caught my eye.

The first thing I saw that brought me to a full stop was a West Virginia Centennial license plate topper. I looked at it, told myself I did not need it, and walked away. About 100 feet down the row I turned around, went back to the table where the WV piece was, and purchased it after a little haggeling. I knew this would not be going into any artwork, but something that would just look good on the wall.

If only all the cans were a buck!

If only all the cans were a buck!

I started finding a few tins here and there, some old, some new, but all with usable color or texture for future art pieces. Then I stumbled upon two plastic roosters in their original cartons! Oh joy! Now I think there is something funky about plastic roosters wearing their cardboard boxes. They were six bucks for the pair and ……drum roll please…… made in the USA!

What will my wife and I do with these critters? I have no idea. Coincidently, I am currently reading the book “Never Stop to Think….Do I Have a Place for This?”, by Mary Randolph Carter. This book is helping me realize that either I am not crazy, or that there are a lot of crazy people in the world just like me.

Two plastic Rocky-the-Roosters in my wagon! Ha!

Two plastic Rocky-the-Roosters in my wagon! Along with them are a few tins that will be going under the shear back at the studio.

Would you believe that while my wagon was parked in front of another dealer’s space that a woman tried to purchase them? The dealer almost seemed offended and quickly replied, “Mam, those are NOT mine!”. At another dealer’s space I was purchasing some metal and I came back to my wagon to see that one of my roosters were gone. Yes, GONE! I searched the ground quickly to see if it had fallen out. Then I notice a nearby six year old boy holding it and showing it to his mother in the hopes that she might buy it. I got my rooster back.

My regular breakfast stop at Rogers.

Now about this time I start getting hungry for breakfast and that means a stop at Paisano’s. If you read my blog with any regularity, you already know how much I like this pizza. It is the bomb! I lucked out, as it was fairly early and the line had not become too long yet. I got one slice to eat now and a slice to eat a while later. Oh yeah!

My mother taught me to always eat a proper breakfast while at the flea market!

My mother taught me to always eat a proper breakfast while at the flea market!

Deborah Butterfield knockoff?

Deborah Butterfield knockoff?

You just never know what you are going to see at the flea market. In this case, a kitschy version of a Deborah Butterfield horse. Please go to a museum and see a Butterfield piece FOR REAL!

The crowd grows bigger!

The crowd grows bigger!

I considered heading back to Wheeling after just a few hours because just getting through the crowd was getting difficult. It was actually becoming problematic to just get in and out of booths to look at things.

Waiting to be adopted.

Waiting to be adopted.

As I headed back to my truck I stopped to look at a few things, most of which I did not purchase. However, I did pick up a few highway signs from a dealer and these will find a new life back at the studio.

As I loaded the truck for the drive back home, I noticed this cute little trailer parked near by. Now, I was thinking, THAT is the way to visit flea markets!

IMG_1639